Harvest Goddess of HoLV

Harvest Goddess of HoLV
This is Your Life

Tuesday, June 15, 2010

The Events of 20 Winter in the 1st Year


At 6.00 a.m. on the morning of 20 Winter in the first year, Tim will come to your farm to tell you about a Robot Mole who has appeared in the Mine. He will urge you to see it for yourself, telling you that it sounds 'cool'.

Obviously, this is a hint to you to go to the Mine to experience your second robotic battle. As easy as the first, which was the battle against the Robot Crow, you should be able to defeat the Mole with no more than two strikes of the Hammer.

Once defeated, after the Event ends, you can re-enter the Mine immediately to find two new Chambers in the form of Chamber 6 and Chamber 7. Take the left branch of the second tunnel. When you go beyond Chamber 4, you will find the room in which you fought the Mole. At the far end are two new entry arches. The one on the left will take you to Chamber 6. The one on the right leads to Chamber 7.

The Rocks in Chambers 1 through 5 contain the same items. It is in Chamber 6 that you will be able to mine for new Gems.

Chanmber 6 is the only Chamber in the Mine where you can find Rubies and Amethyst. The chance of finding either is only 1%, however, so do not be disappointed if you do not obtain any immediately.

Other new items that are available both in Chamber 6 and Chamber 7 are various Fossils. Unlike Gems, which always will go into your Rucksack, any Fossil you find for the first time is considered a 'rare' object worthy of your Storeroom.

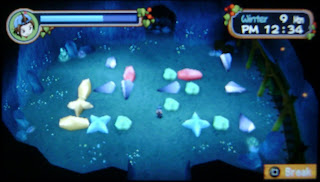
Here are the Configurations of each:


Chamber VI.I before and after:


Chamber VI.II before and after:


Chamber VII.I before and after:


Chamber VII.II before and after:

Note that, should you fail to defeat the Mole, you still will be able to enter Chambers 6 and 7 if you reenter the Mine after the Event. If you do not defeat the Mole or fail to visit the Mine at all on 20 Winter, you will experience an Event with Rudolph on 21 Winter at your Farmhouse. He will inform you that the company has removed the Mole from the Mine after receiving a report from him as to the dangers it posed.

In the Event on 21 Winter, which you will not experience if you defeated the Mole yourself, Rudolph will announce that part-Time work again will be available 'tomorrow'. This is not entirely accurate. For a start, if you have unlocked the Mine prior to this by working for Rudolph 5 times, there no longer will be any Part-Time Work. Part-Time Work, even if available, can be obtained only on weekdays. A long weekend follows 20 Winter because of the double Sunday occurrence caused by Liar's Day.

Monday, June 14, 2010

Mining Puzzles

There are two possible configurations for any Chamber in the Mine in HoLV. I made a video about this, but decided to post stills on this site, as even I sometimes forget the configurations and am lazy about it. WIth it here on my site, I can refer to it immediately.

I have used Roman Numerals for each Chamber and each Configuration. Thus, the first Chamber would be Chamber I. The first Configuration would be Chamber I.I. and the second would be Chamber I.II.

Incidentally, if you push any Yellow Rock too far and have no way to fix it, simply leave the Chamber and return. All Rocks will be reset to their original position.

The video I made on YouTube some time ago is more sophisticated, but this post at least will give players a quick reference point to the ten possible Configurations in the first five Chambers of the Mine.

My Character, as small as a flea in the screenshots, is standing in each 'after' screenshot at the Rock that needs to be smashed with the Hammer.

Remember always that only the Yellow Rocks can be moved but that they cannot be hit directly with a Hammer. The only way to smash a Yellow Rock is with an explosion wave from a Rock of any other colour.

You can smash the Rocks manually one by one, apart from the Yellow Rocks, but it will cost you dearly in energy and you will lose the items that are inside any Yellow Rocks in the Chamber.

To move any Yellow Rock, stand as close to it as possible until you see the prompt to 'Grab' with the O Button. Use the O Button to 'Grab' it. You then can move to any side of the Rock without letting go of it. Once your Character is positioned to push the Rock in the right direction, use the X Button to 'Push'. When the Yellow Rock has been placed properly, find the Rock that you wish to smash and, with Hammer equipped, use the Square Button to smash it. If the Explosion Wave destroys every Rock in the Chamber, you will hear a fanfare and see a prompt: Well done!


Chamber I.I before and after:


Chamber I.II, before and after.


Chamber II.I before and after.


Chamber II.II before and after.


Chamber III.I before and after.


Chamber III.II before and after.


On 1 Winter in the first Year, the second set of tunnels north of Chamber 3 should be cleared of rubble. You will be able to enter one new Chamber to the left and another new Chamber to the right. The tunnel to the left leads to this Chamber:


Chamber IV.I before and after.


Chamber IV.II before and after.


Take the tunnel to the right to find the fifth Chamber.


Chamber V.I before and after.


Chamber V.II before and after.